
Electronic Disclosure, also known as electronic discovery, ediscovery, eDiscovery, or e-Discovery, is the electronic aspect of identifying, collating, collecting and producing electronically stored information (ESI) in response to a request for disclosure (also known as production) and/or disclosure list in a court order or investigation. ESI includes, but is not limited to, emails, documents, presentations, databases, voicemail, audio and video files, social media, and web sites.
XBundle has a team of eDisclosure experts that can assist you with every aspect of your case and can use various eDiscovery platform. One of our recommended eDiscovery platform is Everlaw.
Everlaw is a cloud-based eDiscovery platform with the speed, analytics, and ease of use to unlock the collaborative power of litigation. XBundle can offer Everlaw software as a service (SaaS) or a full managed service.
From technology selection, to setting up and managing technology assisted reviews, designing workflows, Timeline/chronology, data collection, data processing and hosting we have the skills, experience and technical know-how to ensure you collect and process the relevant data you need. XBundle is the only organisation that can provide a genuine end-to-end service under one roof.
If you wish to learn more about Timelines and Everlaw, please contact info@xbundle.co.uk. We are happy to provide you with a demo on Everlaw for free.
1. What is Everlaw and what is Storybuilder?
Everlaw eDiscovery software is a powerful yet easy-to-use litigation solution that spans all phases of eDiscovery from document review to trial preparation. Storybuilder provides a comprehensive toolkit for remote legal work, from crafting legal arguments to preparing for trial.
2. What is the dashboard feature on Storybuilder
In the dashboard, you can view a count of documents added to your Story listed. You can adjust the time span by what matters most to you.
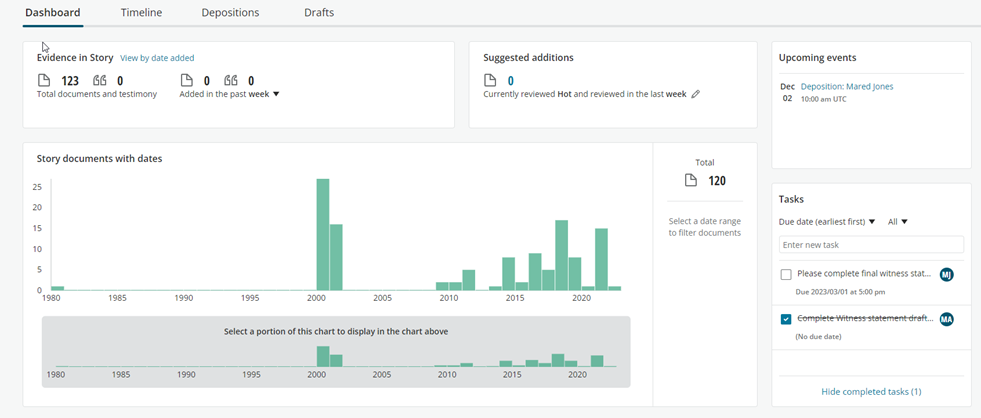
You can also view how many potentially relevant documents were reviewed in a certain time period. By default, the dashboard suggests documents rated in the past week, but you can customize the suggested addition criteria to suit the needs of your case.
3. What is a Timeline on Storybuidler?
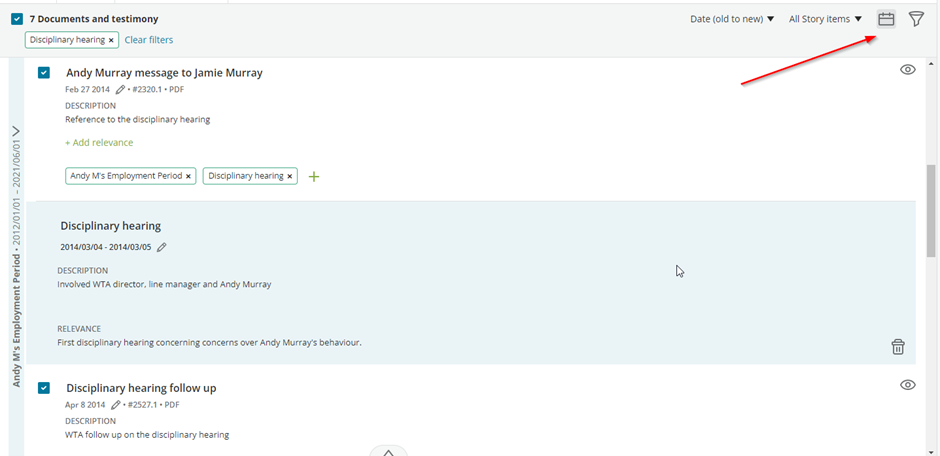
The Timeline is a collaborative tool that allows you to categorise and sort the documents within your story. In the Timeline view, you can add dates story labels and annotations to your documents. Timelines are a view of your story. Each Timeline is associated with a particular story and multiple users in that story can work on that Timeline simultaneously. You can think of the Timeline as a particular display of the documents within your story.
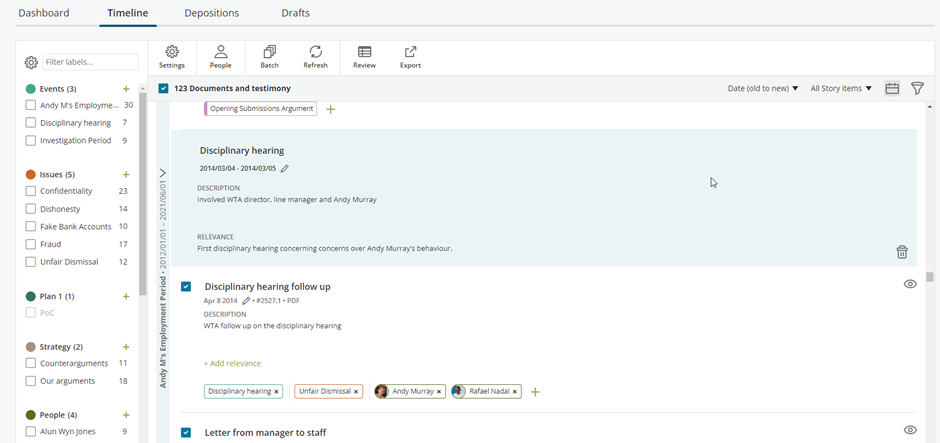
4. How do you view your documents in the Timeline?
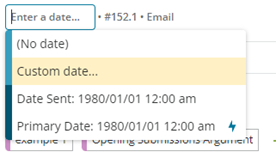
By default, documents are listed in the Timeline either by their bates number or by their custom story names if you have chosen to rename any documents. Each documents entry also includes the documents type such as PDF, text and the date field chosen when the document was added to the story. If there’s no date is selected or you would like to change the metadata date, click the date under the documents title (pencil) and select a metadata field or enter a custom date.
To get a quick preview of your document, click the eye icon on the right side.

5. How do you filter documents in your Timeline?
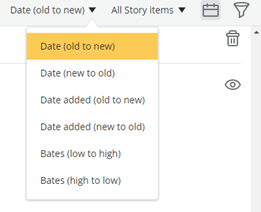
The Timeline is sorted by date from newest document to oldest according to the data metadata field you specified when adding your documents to your story. You can sort by date, date added, bates number.
You can also filter document entries by keyword or date click the filter icon to the right of the sorting menu. You can enter words or phrases that will search across the document’s description, relevance titles and metadata values. The search syntax follows the same rules restrictions as content searching in Everlaw’s query builder.
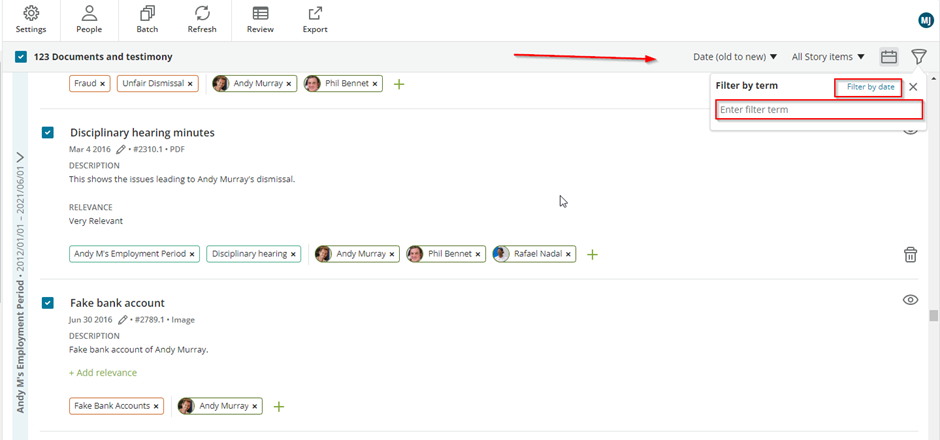
To search by date, simply click on the filter by date and enter a date range in the pop-up. To rename a document in a story, click on the current name and type the new name and click enter. To add a description or relevance to a document, click the respective green text. If document already has one of these fields populated, simple click the text box to edit it.
You can perform a batch action on all the documents in your story by clicking on the batch icon in the ribbon or by clicking the space bar on your keyboard.

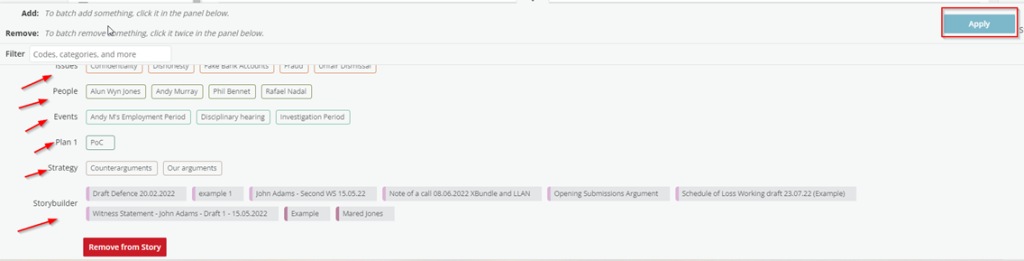
For example, you can batch add documents to a draft or add labels or set the same date for multiple documents. To toggle display of description relevance and relevance metadata fields for each document click settings and check or uncheck. If you click customise metadata, then you can select which fields are visible when your show metadata by default.
To customise your metadata fields, click ‘settings’ in the left ribbon and then ‘customize metadata’.
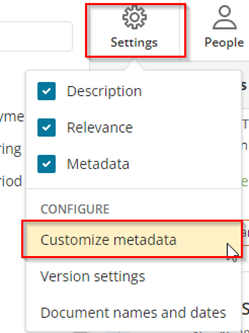
You will then be able to choose the metadata fields you’d like to see with your documents in the Timeline.
6. How to create labels and categories?
Creating labels and categories are essentially another method quickly identify key documents related to a particular events, issues, people or drafts.
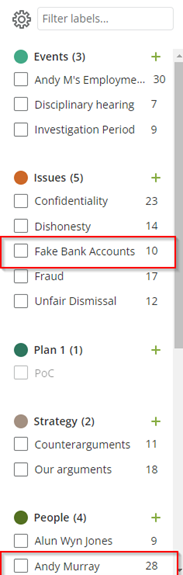
To add a new label within a category, click the associated green plus sign and start typing the label name press ENTER to add the label to the panel note that clicking the plus sign. There are 5 default label categories, Events, issues, people, depositions and drafts. If you want to add a new category, click on the gear icon in the upper left of the label panel. To enter edit mode, click the plus sign and type new category and then click ENTER. To delete a category or specific labels you wish to delete – confirm deletion then press done to exit edit mode.
You can create labels in the Timeline view, but these labels will apply to documents across your entire story. You will be able to see these labels on documents you have added to a draft.
For example, you might want to look at fake bank accounts and related to a person Andy Murray. Or you want me to look at all the documents in a particular draft. You may want to look at documents that are not related to fake bank account. You can easily do this and more by labelling your documents in your story.
TIPS*
- We do recommend creating all relevant categories and labels at outset of a case to avoid having to retroactively apply new created labels to documents in the story.
- Labels should reflect occurrences, interactions, communications or entities the narrative your project.
- Use the batch functionality to add and remove multiple labels
7. What are the ‘special label categories’?
There are two special categories, events and people.
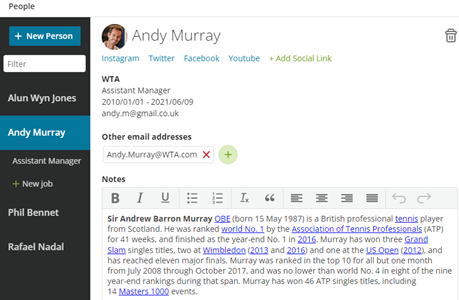
People is a special type of label category because creating a people label also creates a corresponding people profile. With people profiles, you can document details such as person’s contact information, work history, work relationship with other people and more. With each entry you can specify a profile image, social media links, email details and any drafts associated with that person. You can also add a new job in the left-hand panel enter the person’s job role at the top and their organisations, can select a date range of employment. Just like the other labels, you will be able to see and apply people labels wherever documents come up throughout your story.
Events is a special type of label category because you can view each event date range alongside documents in your Timeline chronologically. Events labels can help you contextualise how documents are related to a particular event and how those events are related to each other.
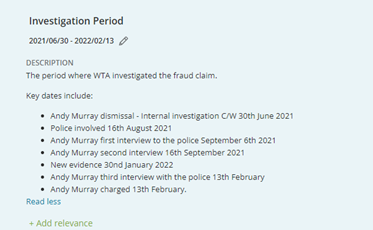
In order to use the event view, you must have already created at least one event and you must have already sorted the document entries by date. Creating events labels is the same as any other kind of label expect you must specify a date range. Once you’ve done this click the EVENTS button next to the filter and a light blue marker will appear which represents the event date range.
Since your documents are in chronological order you can imagine your list of documents as one long vertical Timeline. The horizontal component of the event marker represents the start of the event as if it’s another row in your Timeline. If you have an event whose date ranges does not include any documents, you will only see the horizontal bar. If you have documents that fall within an events date range then the blue marker will wrap around all documents that fall within the range. Using this view, you can contextualise the documents in relation to the occurrence and timeframe of major events. If you have a document that is related to an event but does not fall within the events date range, the blue marker will not encompass that document.